
What is Dataverse for Teams?
Hands on Lab – Power Apps in Microsoft Dataverse for Teams
Goals for this Lab:
|
|
|
Create the Help Desk Power App.
-
Login to https://teams.microsoft.com/ using an account with a valid Office license.
-
** You can also leverage an existing Microsoft Team
Select ‘Teams’ on left hand navigation and then click on ‘Create a team’ option.
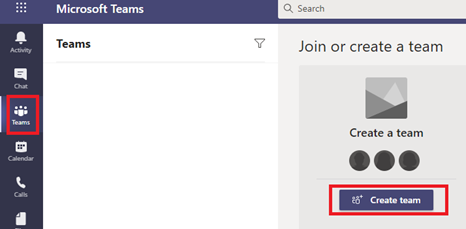
- Click template as ‘From scratch’ > ‘Private team’ and give your Team any name of your choice and click Create.
- You can add users as members or just skip adding any members.
-
You should now have a Team created.
We will leverage this Team to create our Dataverse for Teams Tables.
-
In https://teams.microsoft.com/ on the left-hand navigation, select Apps and search for “Power Apps” and select the “Power Apps” App from the App Store and “Add” the App.
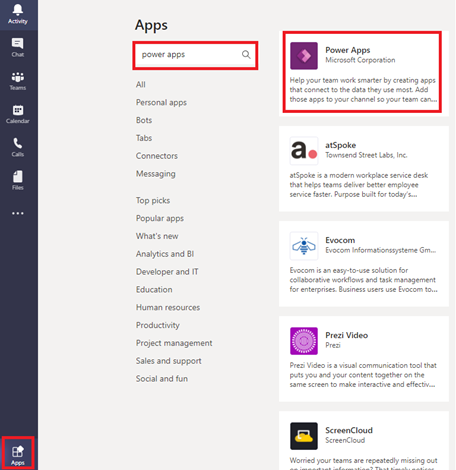
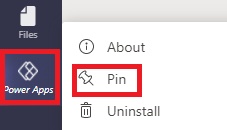
- Once you add the App, it will show up on the left-hand navigation rail. Right-click on the App icon in the left-hand navigation and Pin the App so that it is Pinned to the navigation.
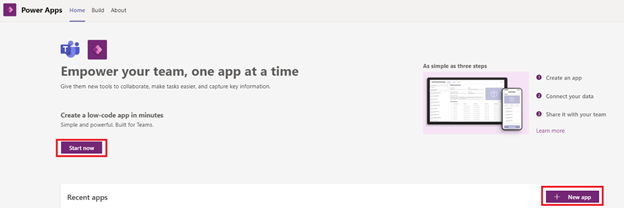
- Select the “Power Apps” Teams App and click on “Start now” or “New app”.
- Select/Search for the Microsoft Team for which you want to build an App and click “Create”.
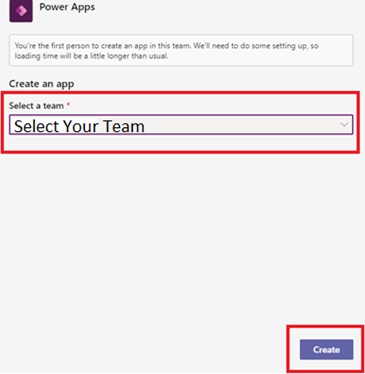
Note:
If you are the first person to create an App in this Team, then a background process executes for creating the Dataverse for Teams environment. You will be notified in Teams once the Teams environment is ready for use.
- If you click on the notification once environment is ready or go the “Build” tab of the Power Apps Teams App for your Team, there you can select the “New” button and create new “App”.

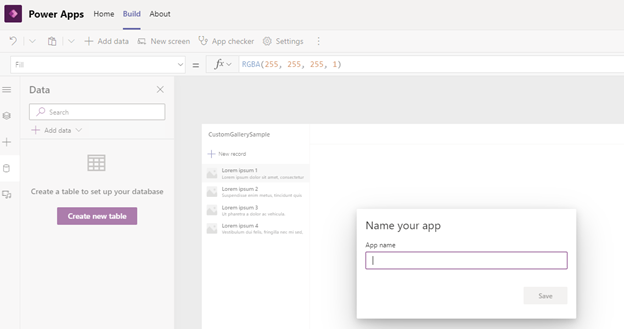
- Once the “Power App” maker experience opens in the Teams context, give your App a name “Help Desk” and click Save.
-
Next, we will create Tables to store data for Tickets and create a related table to store information for Ticket Category & Approver.
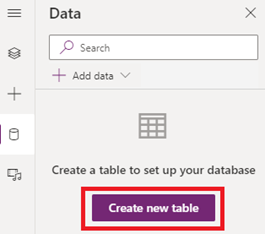
Click on “Create new Table”.
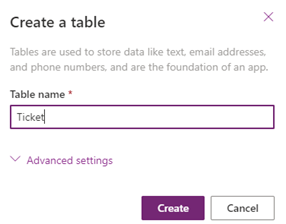
Give Table name as “Ticket” and click Create.
-
This will lead you to the Table creation experience in Quick Edit Mode.
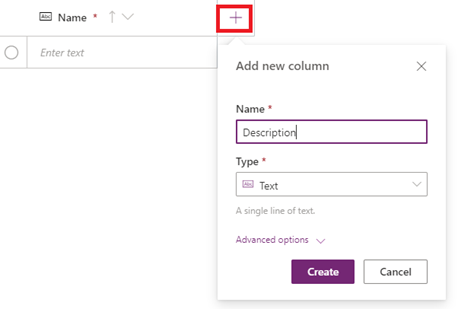
We will create “Description” column of type “Text” by clicking on the + Icon.
-
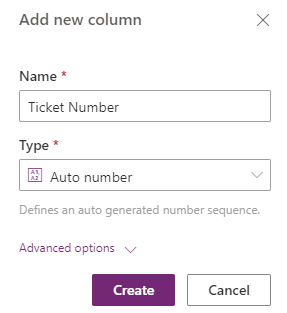
Next, create a column named “Ticket Number” of type “Auto number”.
-
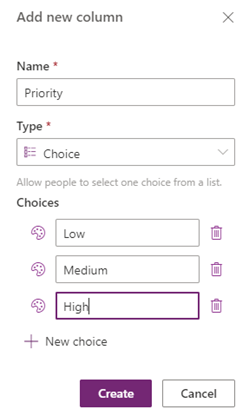
Create column named “Priority” of type “Choice”.
Enter Choices as Low, Medium & High.
-
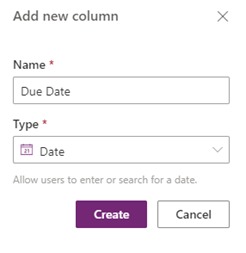
Create column named “Due Date” of type “Date”.
-
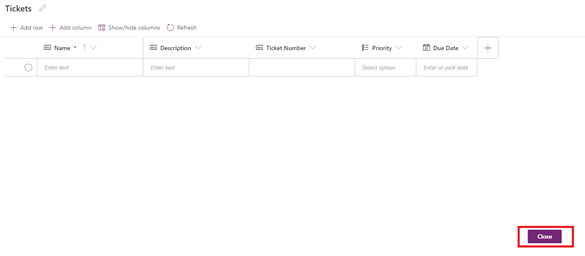
Next, close the Table editor experience by clicking on Close button.
-
The Table will be saved, and the App will automatically include the Table as a connection.
The home screen will now have a connected Gallery and Form control associated with the newly created Table. This is known as the hero layout which automatically sets up the screen for the newly created Table.

Note: If Table creation step does not trigger the experience of setting home page, then go back to the “Power Apps” App in Teams, go to “Build” Tab, and then click on “Help Desk” App

This will reload the App.
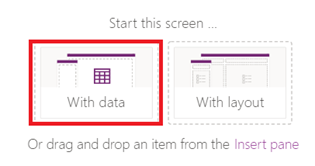
Select start with data.
Select “Tickets” Table from the current environment selector.
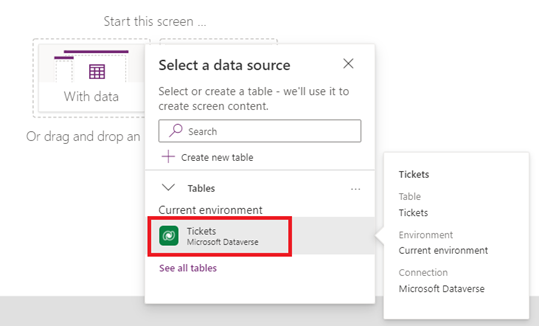
This will setup the home screen for the App with the connected Table.

The home screen will now have a connected Gallery and Form control associated with the newly created Table. This is known as the hero layout which automatically sets up the screen for the newly created Table.
-
We will add another Table which will drive the Category information for tickets.
Go to “Data” option on left navigation in Power App and click “Add Data” and then click on Create new Table.
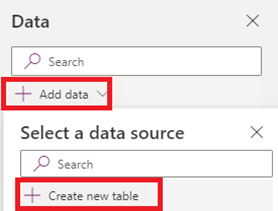
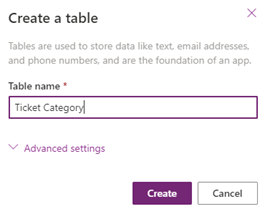
- Name the Table “Ticket Category” and click Create.
-
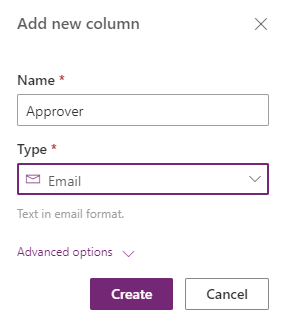
Add a column named “Approver” of type Email.
-
Enter sample data into Table and define your approvers for each Category.
Set yourself as the approver for demo purposes (Ensure you plug in the email ID of the account you are using to build this solution).
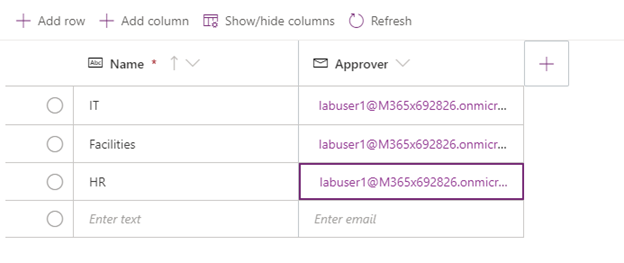
Once complete, click on Close button to Save the Table.
-
Next, we will create an association (relationship) between the Tickets table and the Ticket Categories table. This is where the power of relational database (Dataverse) comes into play.
Go to Data Sources, select 3 ellipses on the Tickets Table and click on Edit data.
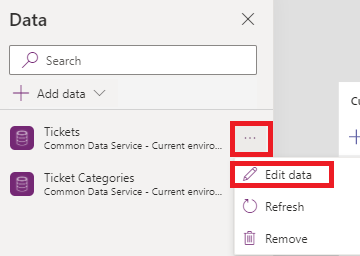
Add column named “Category”, select type as Lookup and select the Related Table as “Ticket Category”.
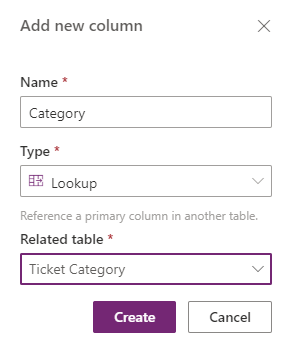
Close the Table edit experience.
-
Next, we will go to the Tree view and select the Form Control to add the newly created column to the form.
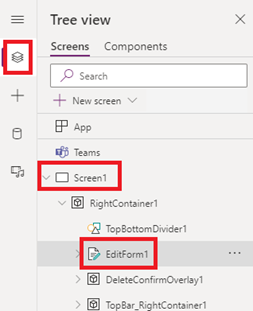
Edit fields and add the Category column to the Form
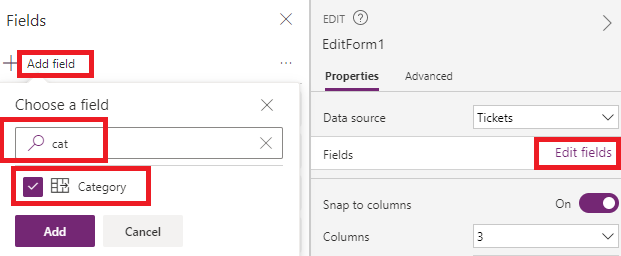
- Preview the App and Add records. Try modifying and deleting data. The App provides full CRUD (Create, Read, Update, Delete) operations.


Notice how the Ticket Number is auto-generated once record is Saved.
Also, the Category column information is coming from the Related Table (lookup).
-
Next, add a column to the Tickets Table called “Ticket Status” of type Choice and add the following Choices – Pending, Rejected, Approved.
Add the newly added column to the Tickets Form on screen.
Same steps as before.
-
Select the “Due Date” data card in the form control, go to advanced properties tab and unlock the card.
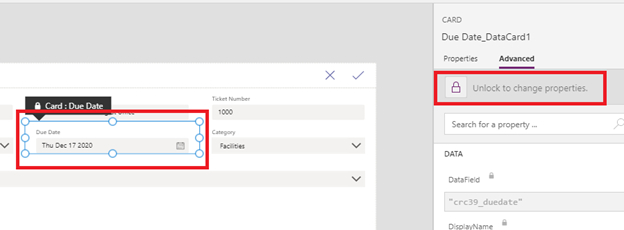
Set Default property of the data card as follows:
If(
EditForm1.Mode = FormMode.New || ThisItem.Priority <> DataCardValue4.Selected.Value,
Switch(
DataCardValue4.Selected.Value,
‘Priority (Tickets)’.Low,
DateAdd(
Today(),
14
),
‘Priority (Tickets)’.Medium,
DateAdd(
Today(),
7
),
‘Priority (Tickets)’.High,
DateAdd(
Today(),
3
),
ThisItem.’Due Date’
),
ThisItem.’Due Date’
)
Where EditForm1 is name of your form control
And DataCardValue4 is the priority Choice field combox box control name.
-
Next, set the Display mode property of the “Due Date” data card to DisplayMode.View
Now if you preview the App, the due date will be automatically calculated based on the selected priority when you create a new ticket.
-
Next, unlock the “Ticket Status” data card from the properties pane on the right hand side and set its “Display mode” property to DisplayMode.View,
Set Default property of the data card as follows:
If(EditForm1.Mode<>FormMode.New, ThisItem.’Ticket Status’, ‘Ticket Status (Tickets)’.Pending)
Set visible property of the data card as follows:
EditForm1.Mode<>FormMode.New
This will ensure the Status is set to “Pending” when a new ticket is created and the Status column is read only when record is edited.
Now if you preview the App, and create a New ticket, you can see the Status column in action.
-
Next, unlock the Priority, Description and Category data cards and make them required by setting the required property to true.
-
Set AppNameLabel1 label control Text property to the following:
“Help Center App – ” & Teams.ThisTeam.DisplayName
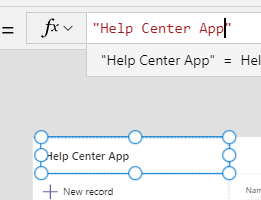
The Teams object will add the team name once we publish the App to Teams.
-
Next, click on Publish to Teams

Click Next (this will Publish the App).
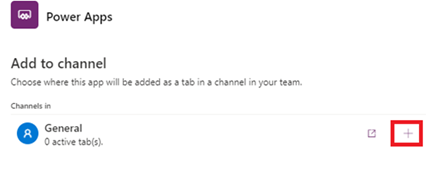
Next, it will list out all the channels associated with your current Team.
To add the App as a Tab to any of your Team’s channels, select the + icon and then “Save and close” button.
-
Now go to the Team’s channel and select the Tab with your App Name.
The App will now be avaliable within Teams and will also work on the Teams Mobile App.

-
Test your App and try adding new records.
-
This App will be available to all the Owners, Members and Guest users of your Team.
- Congratulations!!! You have successfully built a Power App in Dataverse for Teams.
Video walkthrough of Lab (Power Apps in Teams)
Hands on Lab – Build Power Automate flows in Microsoft Dataverse for Teams
Goals for this Lab:
|
|
|
-
In Teams, select the Power Apps Teams App and go to the Build Tab.
This will list out all the Teams that have a Dataverse for Teams environment setup.
Select your Team and click on See All.
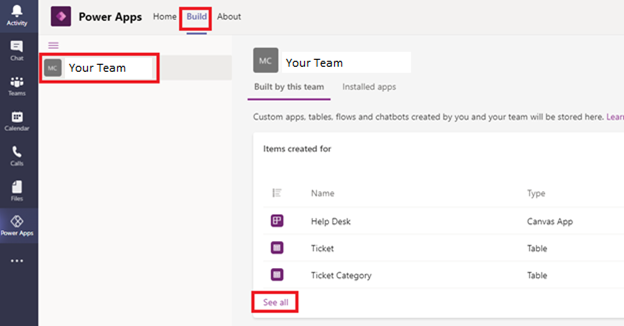
This will list out all the artifacts created within the Team’s environment.
-
Select New, Cloud Flow and then select Automated flow.
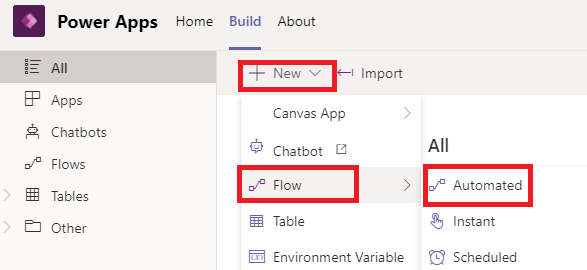
-
Click Get Started if a pop-up message appears.
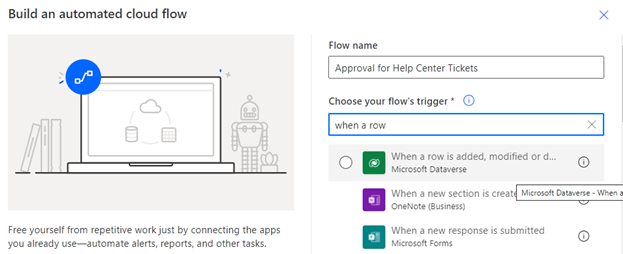
Name your flow “Approval for Help Center Tickets” and select the trigger “When a row is added,modified or deleted” for the Microsoft Dataverse connector and click Create.
-
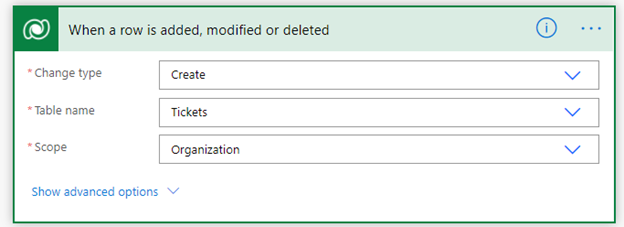
Set trigger action as follows:
-
Next add the “Get a row by ID” action for the Microsoft Dataverse connector and configure as follows.
We will query the related table “Ticket Categories” to fetch the Approver name for the selected Category.
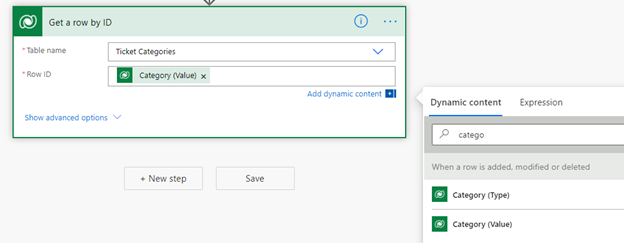
For the Item ID, select the Category (Value) dynamic content from the trigger action.
The Category Value includes the guid for the associated ticket category.
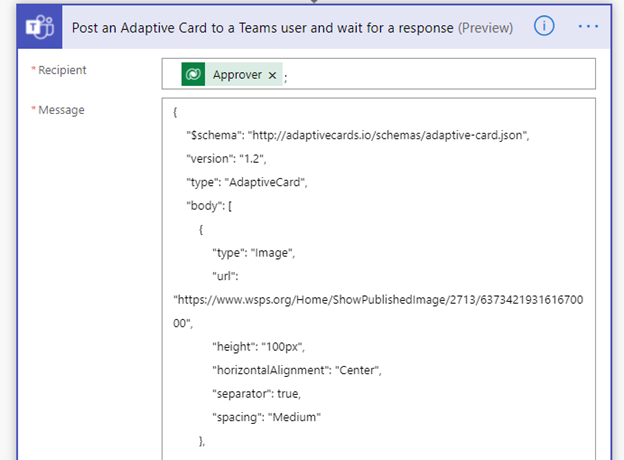
- Next add the action “Post an adaptive card to a Teams user and wait for a response (preview)” from the Microsoft Teams connector.
Set Recipient from the Dynamic Content “Approver” obtained from “Get a record by ID” action.

-
Set Message property as follows:
{
“$schema”: “http://adaptivecards.io/schemas/adaptive-card.json”,
“version”: “1.2”,
“type”: “AdaptiveCard”,
“body”: [
{
“type”: “Image”,
“url”: “https://www.wsps.org/Home/ShowPublishedImage/2713/637342193161670000”,
“height”: “100px”,
“horizontalAlignment”: “Center”,
“separator”: true,
“spacing”: “Medium”
},
{
“text”: “New Ticket Approval Request – $ticketnumber”,
“type”: “TextBlock”,
“weight”: “Bolder”,
“fontType”: “Default”,
“color”: “Accent”
},
{
“type”: “ColumnSet”,
“columns”: [
{
“width”: “stretch”,
“type”: “Column”,
“items”: [
{
“type”: “TextBlock”,
“text”: “Title”
},
{
“text”: “Description”,
“type”: “TextBlock”
},
{
“text”: “Due Date”,
“type”: “TextBlock”
}
]
},
{
“width”: “stretch”,
“type”: “Column”,
“items”: [
{
“text”: “$TicketTitle”,
“type”: “TextBlock”
},
{
“text”: “$TicketDescription”,
“type”: “TextBlock”
},
{
“text”: “$DueDate”,
“type”: “TextBlock”
}
]
}
],
“bleed”: true,
“style”: “emphasis”
},
{
“type”: “ColumnSet”,
“columns”: [
{
“width”: “stretch”,
“type”: “Column”,
“items”: [
{
“text”: “Decision”,
“type”: “TextBlock”
}
]
},
{
“width”: “stretch”,
“type”: “Column”,
“items”: [
{
“choices”: [
{
“title”: “Approved”,
“value”: “Approved”
},
{
“title”: “Rejected”,
“value”: “Rejected”
}
],
“placeholder”: “Decision”,
“type”: “Input.ChoiceSet”,
“id”: “acDecision”
}
]
}
]
},
{
“type”: “ActionSet”,
“actions”: [
{
“title”: “Submit Response”,
“type”: “Action.Submit”
}
],
“horizontalAlignment”: “Center”
}
]
}
-
Now replace tokens in Message JSON
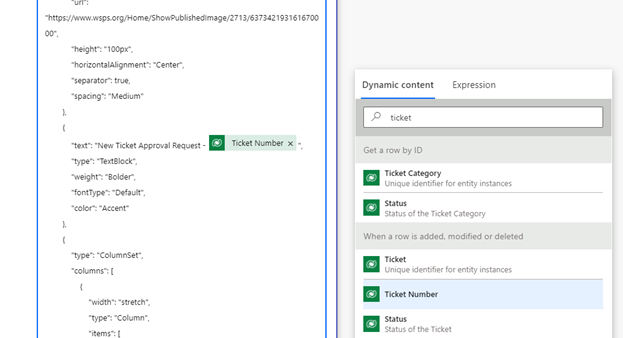
Replace $ticketnumber with dynamic content “Ticket Number” from trigger action as shown below
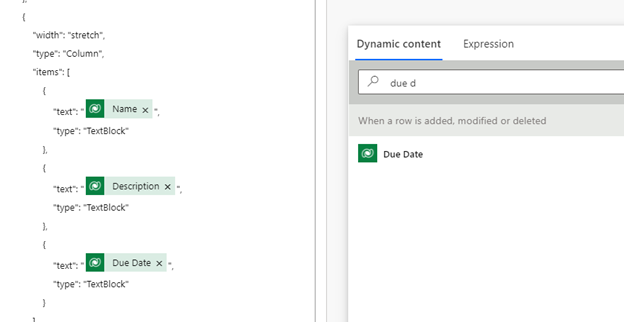
Replace $TicketTitle, $TicketDescription & $DueDate with dynamic content values from trigger action as shown below
-
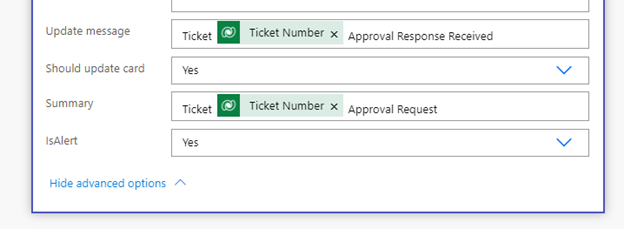
Set remaining properties of card as follows:
-
Save the flow.
-
Rename the Teams action to “Card”


-
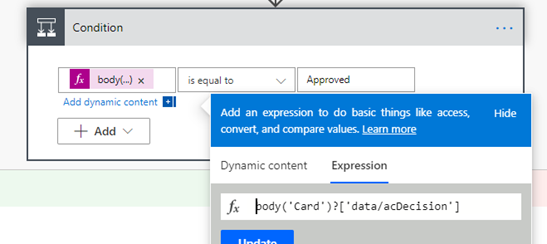
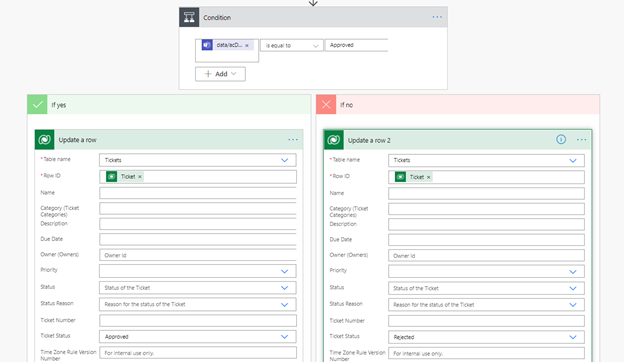
Add a condition and an expression to check the response of the adaptive card as follows.
Check to see if response is “Approved”. For the condition ensure to use the expression dialog.
Expression:
body(‘Card’)?[‘data/acDecision’]
-
For the Yes branch add the “Update a row” action, select Table Name as “Tickets”, select Row ID as dynamic content “Ticket” from trigger action
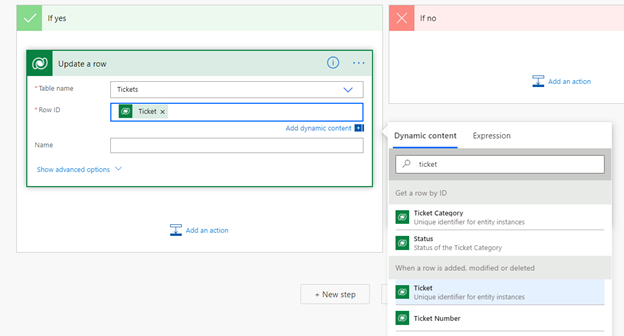
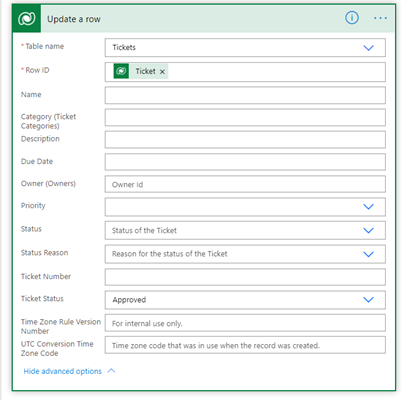
Set Ticket Status to “Approved”
-
For the No branch add the “Update a Row” action, select Table Name as Tickets, select Row ID as dynamic content “Ticket” from trigger and set Ticket Status to Rejected.
-
Save the flow.
-
Go back to your App in Teams and create a new ticket.
-
Once a new ticket is created, the flow will trigger (can take from 5-10 mins to trigger for first flow created in Dataverse for Teams environment), and it will send the Approver (based on the Category selected) an adaptive card in Teams.
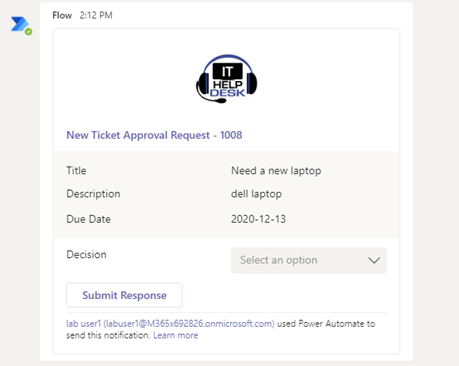
-
The Approver can then take their decision and Submit their response directly within Teams.
Once response is submitted the card will close as shown below.
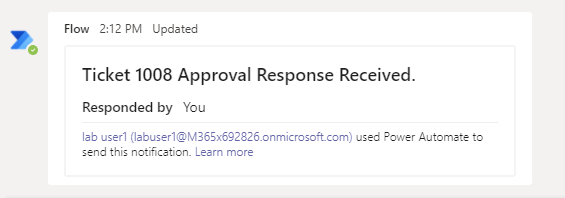
-
The ticket status in the App will be updated based on the Approver’s decision.
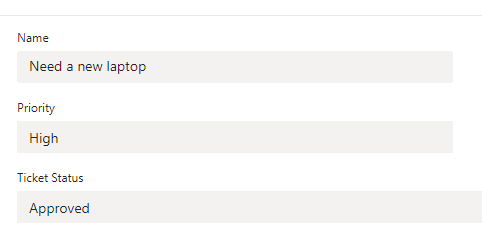
- Congratulations!!! You have successfully built a flow in Dataverse for Teams.
Video walkthrough of Lab (Power Automate flows in Teams)
Hands on Lab – Chat Bots (Power Virtual Agents) in Microsoft Dataverse for Teams
Goals for this Lab:
|
|
|
Build a chat bot for Microsoft Teams
-
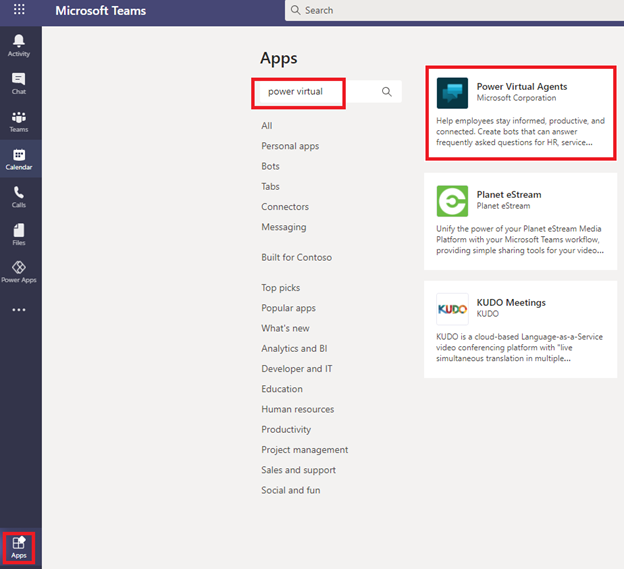
In Teams, go to Apps and select the “Power Virtual Agents” App.
Add the App & pin App to the task bar (right click on App icon on left nav and pin).
-
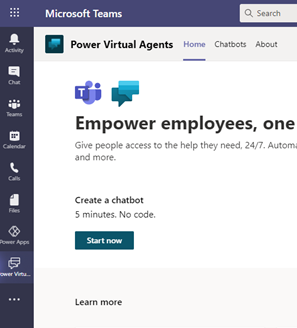
Open the Power Virtual Agents App and select “Start Now”
-
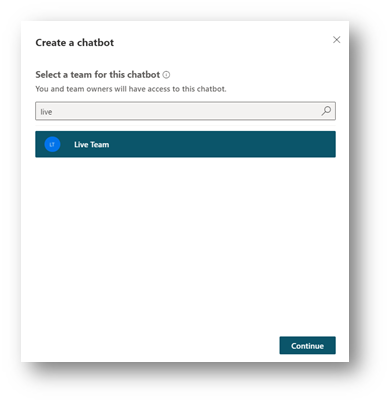
Select your Team and click continue.
-
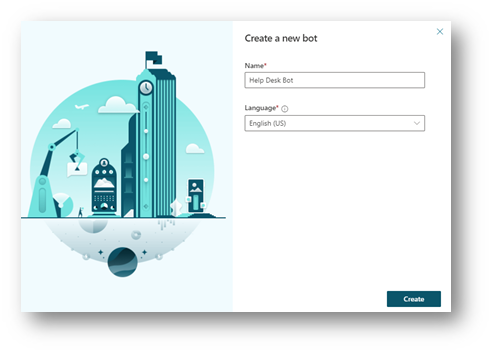
Provide a bot name.
Call it “Help Desk Bot” and click Create
-
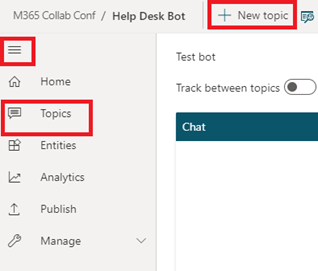
Go to Topics, and a new Topic and create trigger phrases as shown below:
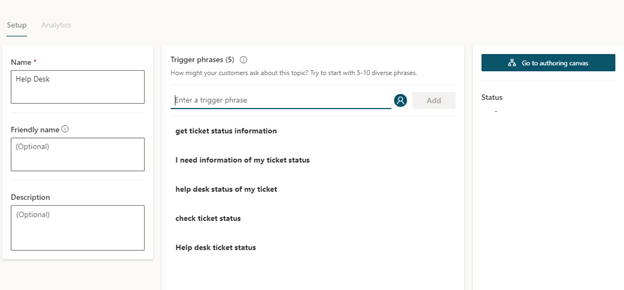
Next, click on go to authoring canvas.
-
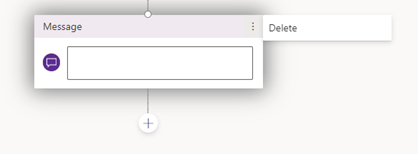
Delete the message node by clicking on 3 ellipses and then select “Delete”
-
Click on + icon
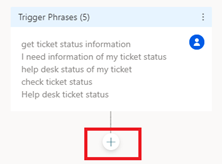
Select, ask a question.
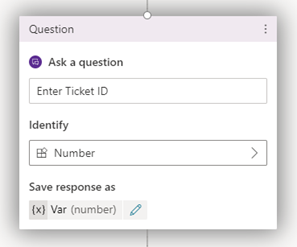
Enter question text as “Enter Ticket ID”.
Configure Identity as type Number:
- Save the topic.
-
Click on + icon after ask a question, and select “call an action”
Select option to Create a flow
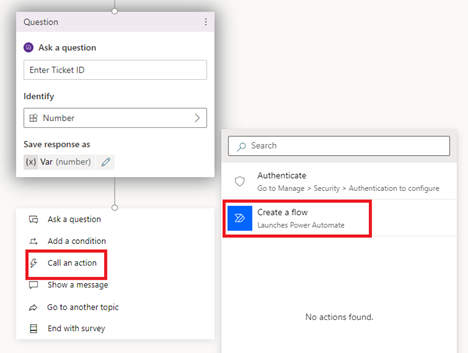
The Power Automate Template selection option will open directly within the chat bot creation experience.
-
Select the first template option
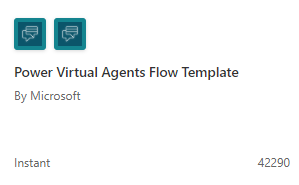
-
For the trigger action, select add an input, select type Number, and rename it to Ticket ID as shown in image below

-
Add an action after the trigger, select “List Rows” from Microsoft Dataverse connector.
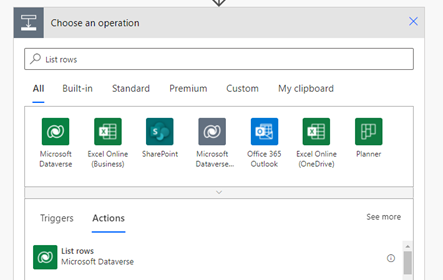
- Select Tickets as Table Name and click on “show advanced options”

Now we need to apply the filter rows query to get the details for the specific ticket.
For that we need the internal name of the Ticket ID.
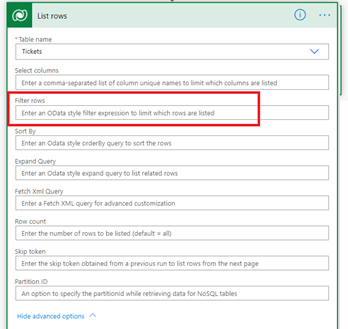
-
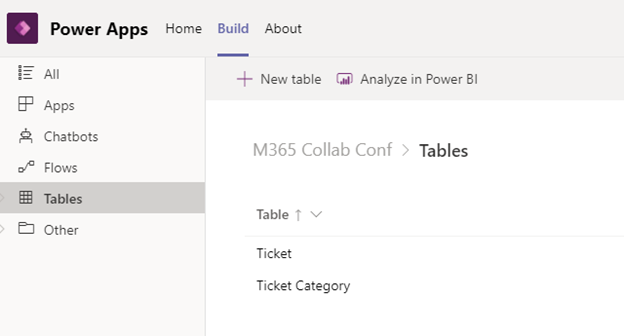
In a separate tab open Teams, go to power Apps App, go to Build Tab, select your Team and click on the “See all” link.
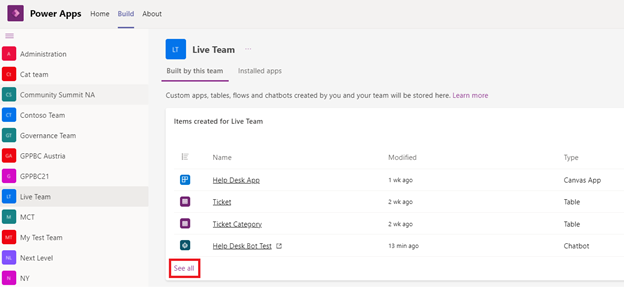
Click on “Tables” and select the “Ticket” table.
-
Once the Ticket table is selected, get the internal name of the Ticket Number column.

-
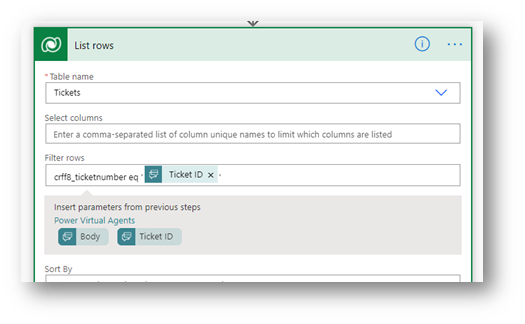
Now back to the “Power Virtual Agents” flow, enter the filter query as follows
Internal column name eq dynamic content of Ticket ID (Ticket ID must be in single quotes)
-
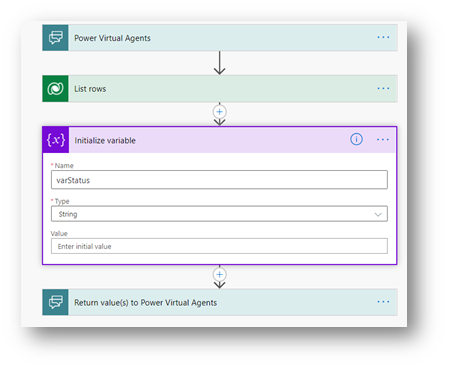
Next add an Initialize variable action.
Set Name as “varStatus” and Type as “String”
-
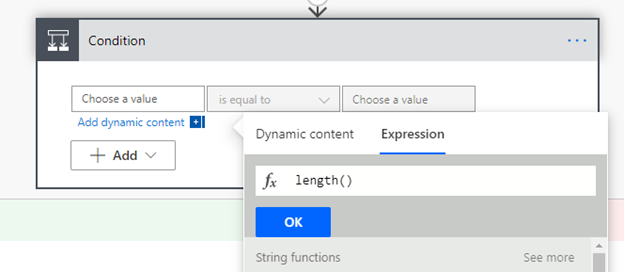
Next, add a condition to check the length of the List Rows action.
For the “Choose a value” click on it to launch the dialog and select Expression tab and enter length()
If you do not get the expression dialog, then ensure you zoom out of your browser or Teams client experience.
-
Click inside length function, ensure mouse pointer is in correct position.

Switch over to Dynamic content and select the Value property from “List Rows” action
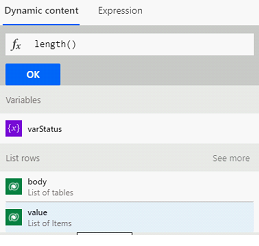
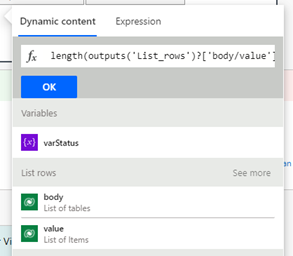
Click “Ok”
- Check condition is equal to 1 as shown below.

-
In Yes branch, set variable as follows:
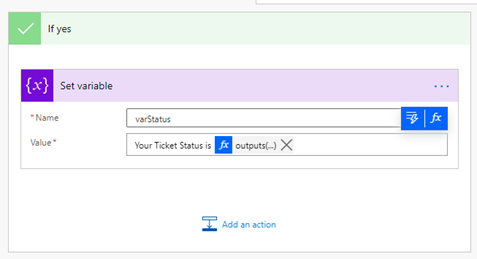
Expression is outputs(‘List_rows’)?[‘body/value’]?[0]?[‘crc39_ticketstatus@OData.Community.Display.V1.FormattedValue’]
crc39_ticketstatus – Your Ticket Status column internal name – Same process to get this value as shown in previous steps.
- In No branch, set variable as shown in figure below.
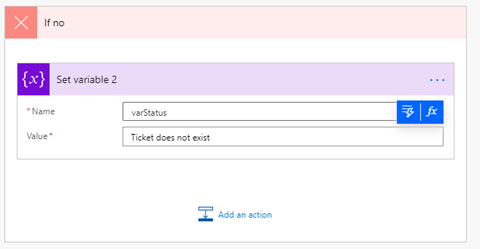
-
In the Return to PVA action, create output property of type Text, call it Output and set its value to the dynamic property of the status variable as shown below

-
Rename flow to “Get Ticket Info” and then click Save.
-
Once the flow is saved, click on the back button

-
Back to the topic (for the chat bot)
Click + icon and select “call an action”, you should see your flow listed there.
Select your flow

-
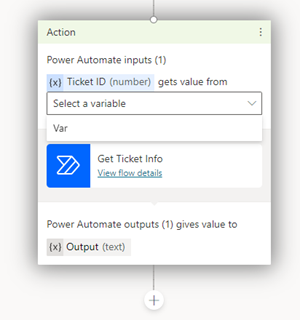
Set flow input as variable Var
-
Next click on + icon after the flow call action and select “show a message”
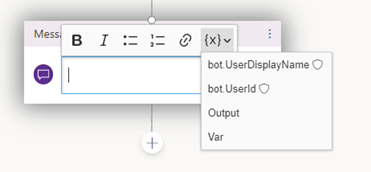
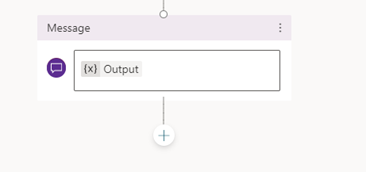
For the message, select the expression syntax and select the Output variable which is coming from the flow.
-
Save the topic.
-
Now test the bot. Enter message as “I need info of my help desk ticket”
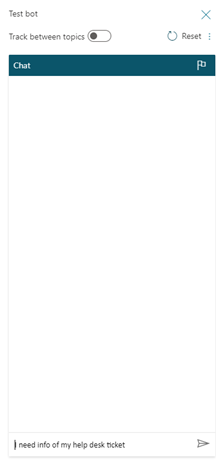
The bot will ask for the Ticket ID
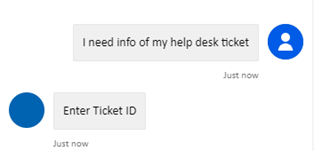
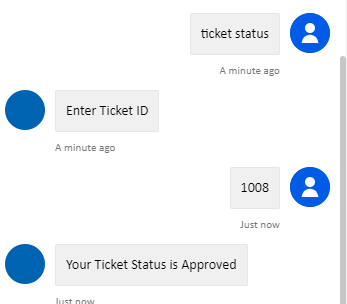
Enter a valid ticket ID and test.
-
Power Virtual Agents chat bot will call flow which in turn will check the status of the ticket from Dataverse and return the value back to the bot.
-
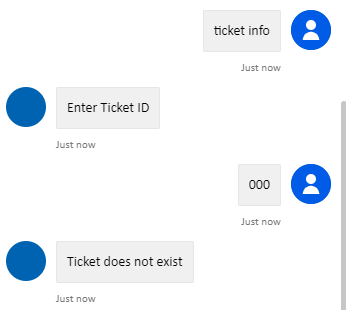
Try again with an incorrect ticket ID
-
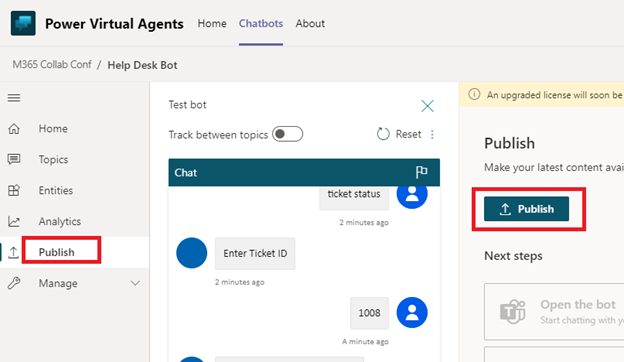
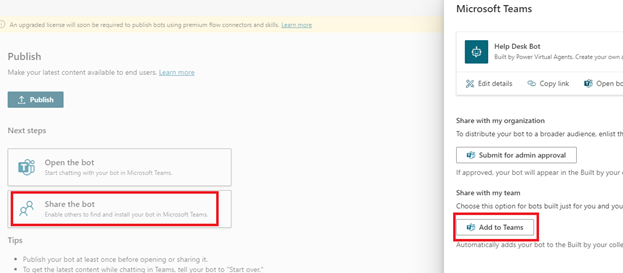
Next, click On Publish and Publish the bot
-
Then click on Share the Bot and click on Add to Teams.
-
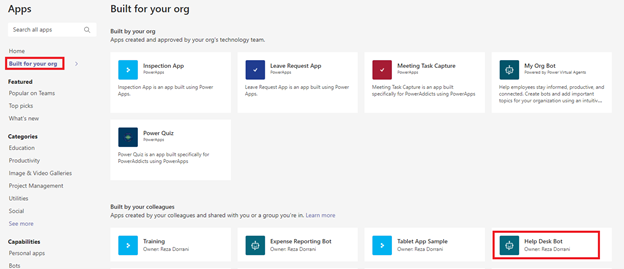
Next go to Teams Apps and select Built for your tenant name on left navigation.
-
Your bot will appear in the list of App to install under “Built by your colleagues” (This might take a few minutes to show up).
Select your bot and add.

Once added, you can pin the bot to the left-hand Teams navigation rail.
-
Now select the bot from the navigation and interact with the bot.
-
Congratulations!!! You have successfully built a bot in Dataverse for Teams.
Video walkthrough of Lab (Power Virtual Agent chat bots in Teams)


Wow, what a write-up! I was not expecting so much detail. This is amazing. Great job.
Thanks
Hi Reza, can i use a pen input for the approver to sign? would the data type be image?
thanks